These Peanut Butter Cheerio Bars are the ultimate solution for busy mornings or afternoon snack cravings. With only three basic ingredients and zero baking required, you can whip up a batch of these chewy, delicious treats in just minutes.
Table of Contents
Why You Will Love This Recipe
There is so much to love about this Easy Peanut Butter Cheerio Bars Recipe. First, it requires absolutely no baking, making it a perfect project for hot days or when you want a quick treat without heating up the kitchen. With only three main ingredients, it is incredibly budget-friendly and uses items you likely already have in your pantry. Finally, these bars are remarkably versatile; they serve as a portable breakfast for hectic commutes or a satisfying after-school snack that kids will genuinely enjoy.
Personal Experience & Testing
I have spent quite a bit of time testing various cereal bar ratios to find the perfect balance between a chewy texture and a bar that actually holds its shape. In my early testing phases, I tried simply mixing the ingredients at room temperature, but I found that the bars fell apart almost instantly. I discovered that heating the honey and peanut butter until they just begin to bubble is the “secret sauce” to creating a binding syrup that keeps everything together.
I also experimented with different pan sizes. While a 9×9 inch pan works well for thinner, snack-style bars, I personally prefer using an 8×8 inch glass baking dish. The smaller pan results in a thicker, more substantial bar that feels more like a meal. One of my most helpful discoveries during testing was the addition of a tiny bit of olive oil. I noticed that without it, the honey-peanut butter mixture was quite stubborn and stuck to the sides of my saucepan. Adding just a teaspoon of oil made the cleanup process much faster and helped the cereal incorporate more smoothly.
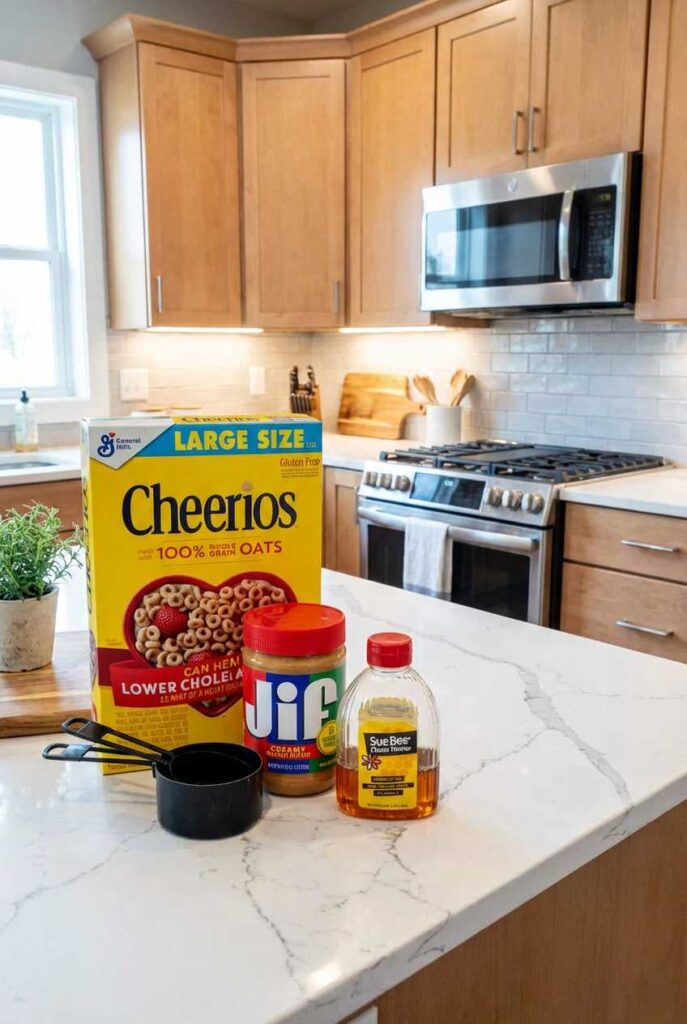
Ingredients
- 3 ½ Cups Plain Cheerios Cereal (Plain, Honey Nut, or Multigrain work best)
- ½ Cup Honey (or maple syrup for a vegan alternative)
- ½ Cup Creamy Peanut Butter
- 1 Teaspoon Olive Oil (Optional, to prevent sticking)
Step-by-Step Instructions
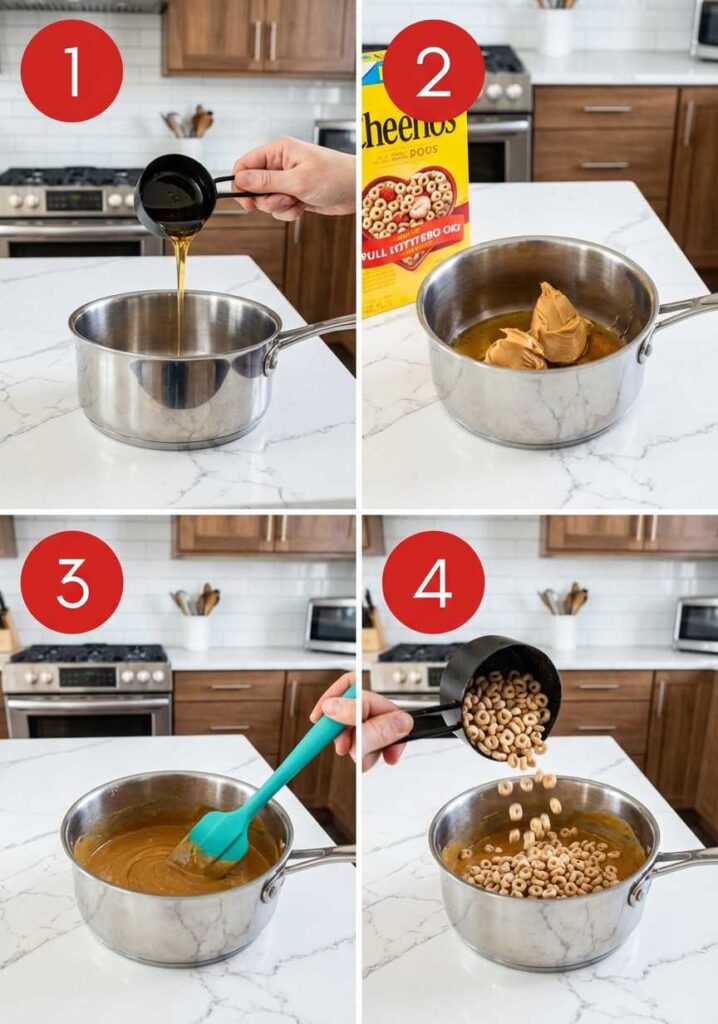
- Begin by measuring out the honey and creamy peanut butter. Add them to a medium-sized saucepan over low heat. If you are using olive oil to help with the consistency, add it now as well.
- Stir the honey and peanut butter mixture constantly. Continue heating over low heat until the mixture is fully combined, smooth, and just starting to show small bubbles.
- Once the mixture begins to bubble, immediately remove the saucepan from the heat.
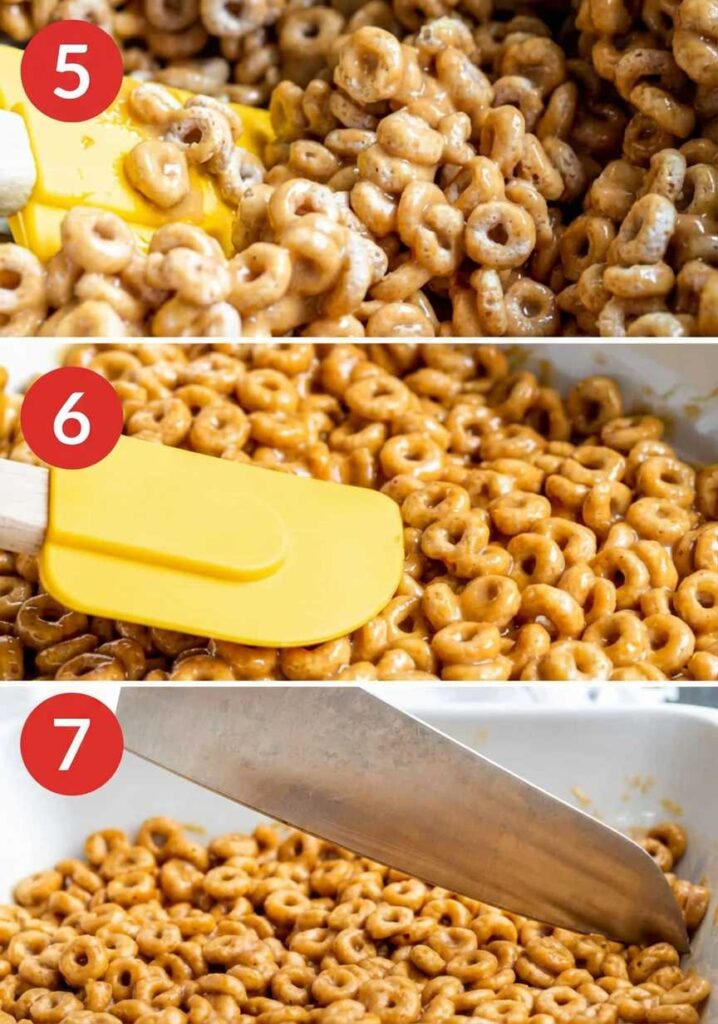
- Add the Cheerios to the saucepan. Use a spatula to fold the cereal into the peanut butter mixture until every piece of cereal is thoroughly and evenly coated.
- Grease an 8×8 or 9×9 inch baking pan with a light coating of cooking spray or butter.
- Scoop the cereal mixture into the prepared pan. Using the back of a spatula or a piece of parchment paper, press the mixture down firmly into an even layer. Pressing down is essential to ensure the bars stick together.
- Cover the pan and place it in the refrigerator for at least one hour. This allows the peanut butter and honey to set completely.
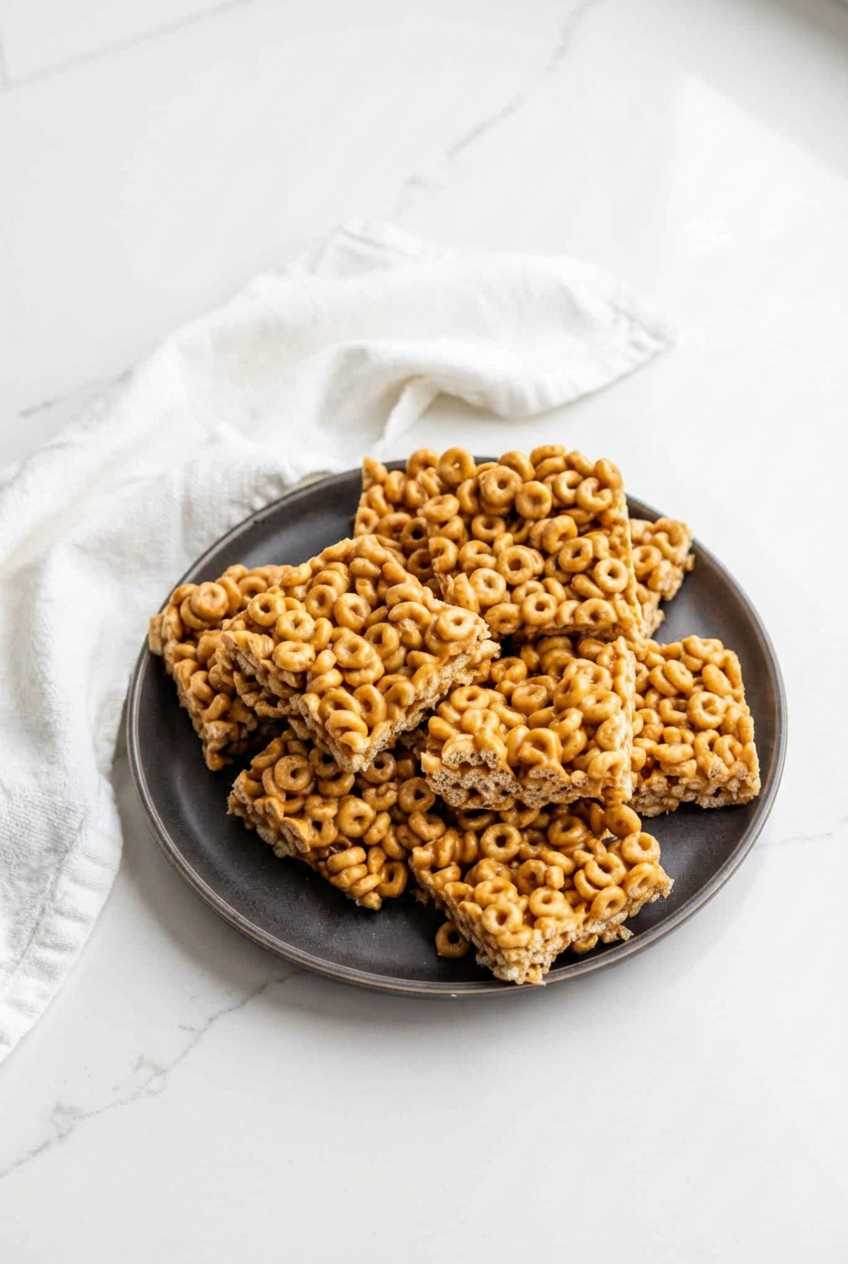
- Once the bars are firm, remove them from the fridge, slice them into squares or rectangles, and enjoy.
Expert Tips / Pro Tips
Don’t Skip the Chill Time: It can be tempting to grab a bar as soon as you press them into the pan, but they need that hour in the fridge to set. If you cut them too early, they will be messy and may fall apart in your hands.
The Oil Trick: As mentioned in my testing, adding a teaspoon of mild olive oil or coconut oil to the honey and peanut butter helps the mixture glide off the pan and makes it much easier to coat the cereal.
Choose the Right Pan: I highly recommend using a glass or porcelain baking dish. These materials make it much easier to lift the bars out once they have set compared to some metal pans.
Variations & Substitutions
This recipe is a fantastic base that can be customized in many ways. If you want to make these bars vegan, simply swap the honey for an equal amount of maple syrup or agave nectar. While the flavor profile will shift slightly, the bars will still hold their shape beautifully.
For those with peanut allergies, you can easily substitute the peanut butter with creamy almond butter, cashew butter, or even sunflower seed butter for a nut-free option. You can also experiment with the cereal itself. While plain Cheerios are the classic choice, Honey Nut Cheerios or Multigrain Cheerios add a nice depth of flavor. If you are feeling adventurous, you can even try using Special K or cocoa-flavored puffed rice cereal.
Serving Suggestions
These bars are the perfect “grab-and-go” food. I love packing them in school lunches as a healthier alternative to store-bought granola bars. They also pair wonderfully with a cup of coffee for a quick breakfast or a cold glass of milk for an evening treat. If you want to turn them into a more decadent dessert, try drizzling a little melted dark chocolate over the top before chilling.
Storage, Freezing & Reheating
Room Temperature: Once the bars have fully set in the fridge, you can store them in an airtight container at room temperature for up to 4 days.
Refrigeration: To keep them fresh for longer, store them in the refrigerator for up to 1 week. This also keeps them a bit firmer and chewier.
Freezing: These bars freeze exceptionally well. Wrap individual bars tightly in plastic wrap and then place them in a freezer-safe bag or wrap them in foil. They will stay fresh in the freezer for up to 1 month. When you are ready to eat one, simply let it thaw on the counter overnight.
Nutrition Information
| Nutrient | Amount per Serving (1 Bar) |
|---|---|
| Calories | 138 kcal |
| Carbohydrates | 20.2g |
| Protein | 3.3g |
| Fat | 5.9g |
| Saturated Fat | 1.1g |
| Sodium | 97mg |
| Fiber | 1.3g |
| Sugar | 15.2g |
For more of the best breakfast recipes, check out my:
=> Easy Pan Fried Cinnamon Bananas Recipe
=> Quick Easy Air Fryer Avocados Recipe
=> Strawberry Loaf Cake With Lemon Glaze
=> Bacon Egg Breakfast Tacos With Crispy Potatoes
Make sure to tag me @tastyrecipes.info on Instagram and leave a review below if you make this easy peanut butter cheerio bars recipe. To pin this recipe and save it for later, you can use the button on the recipe card, the buttons above or below this post, or on any of the photos above. Happy baking!
FAQ
Can I use a different type of cereal?
Yes! While Cheerios are the standard, you can use other cereals like Special K, Reese’s Puffs, or Honey Bunches of Oats. Keep in mind that different cereals may change the sweetness level and texture of the bars.
Why are my cereal bars falling apart?
This usually happens for two reasons: either the honey and peanut butter mixture wasn’t heated long enough to reach a bubbling state, or the bars weren’t pressed down firmly enough into the pan. Make sure to pack them tight!
Are these bars gluten-free?
If you use certified gluten-free Cheerios and ensure your peanut butter and honey are processed in a gluten-free facility, then yes, these bars are a great gluten-free snack option.
Can I add mix-ins like chocolate chips or nuts?
Absolutely. If adding chocolate chips, wait for the cereal mixture to cool slightly before folding them in so they don’t melt completely. Chopped nuts or dried cranberries also make excellent additions.
Easy Peanut Butter Cheerio Bars
Ingredients
Equipment
Method
- Prepare your 8×8 or 9×9 inch baking pan by greasing it lightly with non-stick spray or lining it with parchment paper.
- Measure out the honey and creamy peanut butter and add them to a medium-sized saucepan. If you are using olive oil to help with sticking, add that in now as well.1/2 Cup Honey, 1/2 Cup Creamy Peanut Butter, 1 teaspoon Olive Oil
- Place the saucepan over low heat. Stir the honey and peanut butter constantly until the mixture is warm, fully combined, and just starting to show small bubbles.
- Immediately remove the pan from the heat to prevent the honey from scorching.
- Pour the Cheerios into the saucepan with the peanut butter mixture.3 1/2 Cups Plain Cheerios Cereal
- Stir the cereal gently but thoroughly until every piece of Cheerio is well-coated in the peanut butter and honey mixture.
- Scoop the coated cereal into your prepared baking pan. Use a spatula to spread it into an even layer, pressing down firmly to ensure the bars stick together.
- Cover the pan and place it in the refrigerator for at least one hour, or until the bars are completely set and firm to the touch.
- Once set, remove from the fridge, slice into bars, and serve.